Before we begin, know that this does need some technical knowledge but any person should be able to follow this guide. You will also need another computer, this can be a mac, pc, laptop, etc. You will need a USB drive as well, I recommend at least 16GB. I also recommend picking up an SD card as a storage expansion since these Chromebooks have very small storage. I got a 2 pack of 32 gig cards for $13.99 from Micro Center.
The laptop in question is a HP Chromebook 11 G4. This Chromebook is decently old and can be had on ebay for very low prices. The lowest I have seen one sold was about $15 but the average is $25 to $30. Here is a link to where you can find these: (Try to find one with a charger or purchase one separately)
Making a bootable linux USB drive
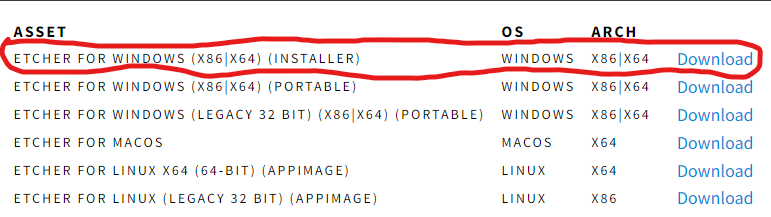
To make a bootable linux USB drive we will be using the tool Balena Etcher, download the version for YOUR current computer. I will show how to do that in some images. The download page is linked below.
Windows Download
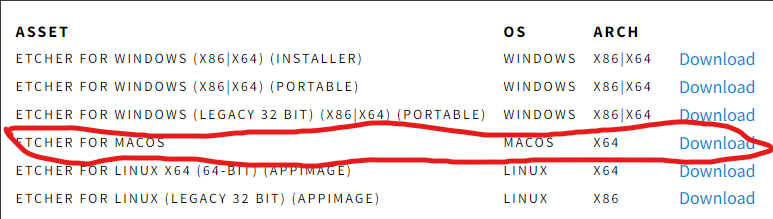
Mac Download
Downloading a Linux Distribution
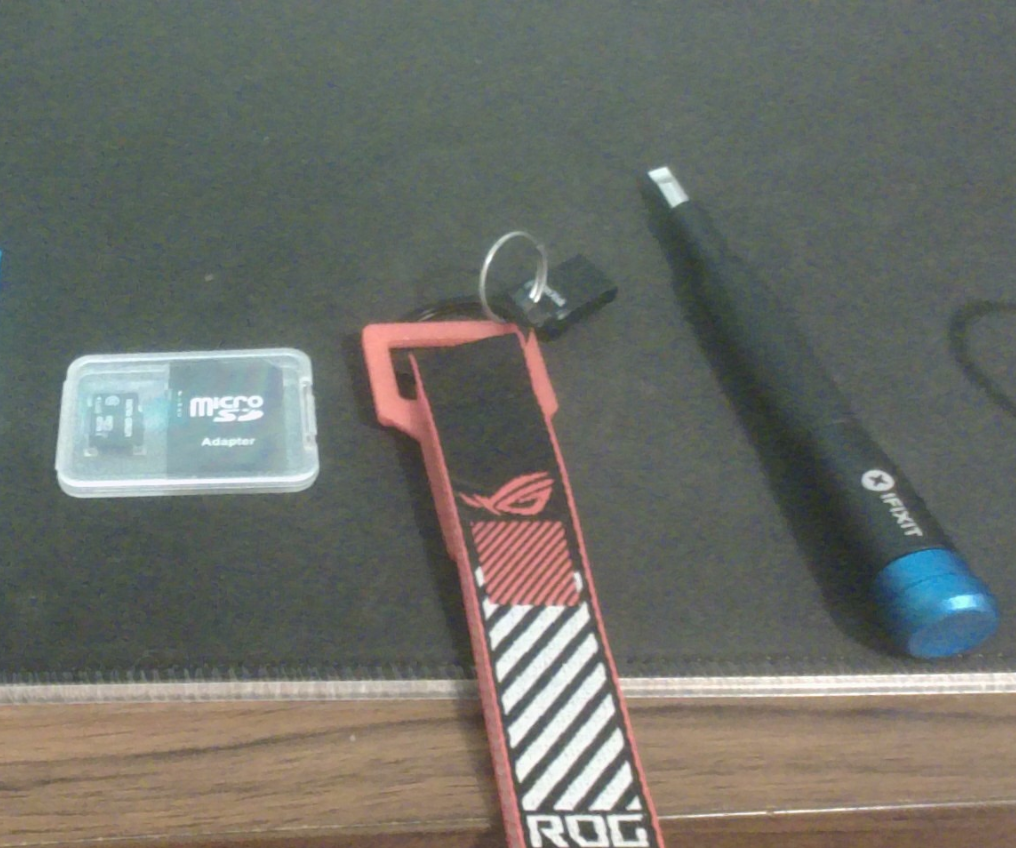
As soon as you are done installing Balena Etcher we can proceed. We now have to pick the distribution of linux we want to use, I will be using KDE Neon. Download your preferred linux distribution, I recommend KDE Neon or Ubuntu. I will put a button to the download link for KDE Neon below. These are the items I will be using: a flatheads screwdriver and a small phillips head screwdriver (I am using a kit from Ifixit), a flash drive (mine is a small SanDisk one that has worked really well and is 64 GB), and an SD card from Micro Center (32 GB)
KDE Neon Download (click the user download button on the linked page):
Installing KDE Neon (live image) on a USB drive
Open Balena Etcher and click the flash from file button shown below.
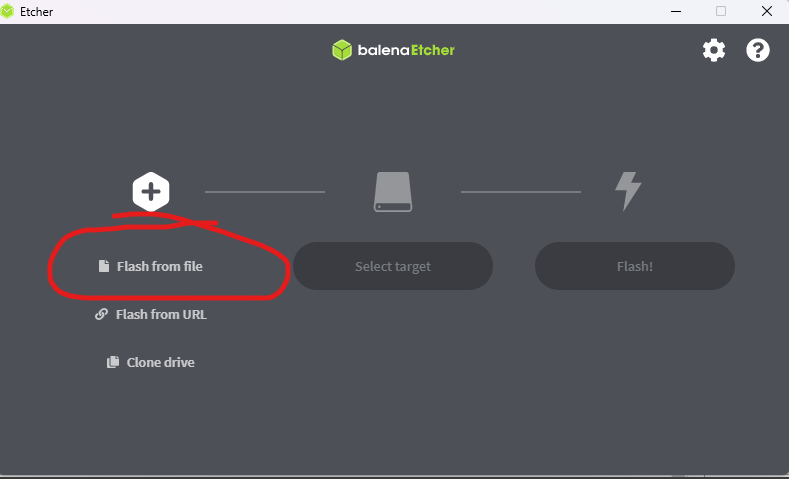
Navigate to your downloads folder and select the .iso file you downloaded in the last step, this file, is our KDE Neon ISO. Now, plug in your usb drive. Click Select target and select your flash drive. Then, click flash. This usually takes about 3 minutes but can take longer.
Installing UEFI Firmware Required for Installing Linux
Chromebooks do not have a full bios/firmware and it is also very locked down. We are going to be flashing our own bios/firmware to the Chromebook. This requires putting the laptop in Developer Mode, as well as removing a screw inside the Chromebook. First, let’s put the laptop in Developer Mode.
Putting the laptop in Developer Mode. IMPORTANT NOTE: PUTTING YOUR LAPTOP IN DEVELOPER MODE WILL REMOVE ALL DATA FROM YOUR CHROMEBOOK AND IT ALSO SHOULD BE PLUGGED INTO THE WALL. Turn on your HP Chromebook 11 G4 and sign in if you have not already. Now, press the ESC, Refresh (reload symbol key), and power buttons at the same time, and immediately let go. Once a white screen pops up saying something about OS Verification go ahead and press CTRL + D and follow what it says to do on screen to turn off OS Verification/Turn on Developer Mode. The enabling Developer Mode screen will come up and will take 5 minutes to enable it. When your Chromebook reboots it will need to be set up again. When you get to a screen that has the option to set up Developer Options or anything like that click it. Your Chromebook may reboot and follow the instructions on screen. It will ask to set a root password. This will not be your Chromebook password, it will be your root password.
Turning off firmware Write Protection. First, power off your Chromebook and then do as I do in the video below.
When your Chromebook is booted up and signed in, continue to the next step.
Installing the UEFI Firmware
We now have the firmware write protection disabled. We can now write to the firmware chip.
First, at the bottom right, select the time. Then, select your Wi-Fi network. Next, at the top of the box, select Information. Last, find the IPV4 address. This will look something like this: 192.168.0.55
Write down those numbers.
On your computer, search for an app called “cmd” or “terminal” or “console”
Then, open the app and type this in, but replace the IPV4 with those numbers and periods you wrote down, “ssh root@IPV4” Then, press enter. You should get a prompt asking for a password, type in the one you set when you enabled developer mode (it will not look like it is typing in, but it is) and press enter.
Copy this code to the clipboard:
“cd; curl -LO mrchromebox.tech/firmware-util.sh && sudo bash firmware-util.sh”
Paste the clipboard in the terminal/cmd/console by right clicking. Then, press enter.
Find the option that says something about UEFI Full rom. Usually, this is option 2.
Type in the corresponding number and press enter. When it prompts you if you want to continue, type “y” and press enter. At some point it will ask you if you want to backup the firmware so you can use ChromeOS again in the future, at this point, if you have one, put in your SD card and type “y” and press enter (then when it says you can, remove the SD card). If you do not have an SD card or different flash drive than the one you installed linux on, type “n” and press enter. After you backup the firmware, or not, it will complete and take you back to the menu. Type in “r” and press enter to reboot.
Installing linux
Your Chromebook should have rebooted into a bios-like environment. It may say it did not boot in. Follow some on screen instructions until you get to a screen which has an option called “boot selector” When you find this option, plug in your linux install USB drive. Then, navigate to the option with the arrow keys and press enter on it. Navigate to your USB drive with the arrow keys and press enter on it. You should boot into a linux environment (this will take some time) We are not done though. We now need to install linux on the emmc flash storage. On the desktop of the linux environment you should see an app that says something about installing. Go through the steps on installing the operating system. It should be simple enough, however, if you cannot figure it out, look up how to go through the installation program of your desired linux distribution. At the end it should give a “reboot now” or “don’t reboot” option. Click the reboot now option. When it says to, remove the usb drive and do what it says on screen (usually press enter) Your chromebook should just boot up into linux after that. If you ever want to install a different distribution of linux, install it on the usb drive, shut off the laptop, and turn on the laptop while pressing the ESC key a bunch until it boots into the bios-like environment and just go into the boot manager and boot up the usb and install it etc.
Conclusion
In conclusion, installing linux on a Chromebook can be somewhat difficult, but it is very good for making old hardware work well again. The HP Chromebook G4 does not have security updates anymore, so linux is a must have for some people. You also could install Proxmox or Kubernetes on a bunch of these laptops and have a very small good cluster, and even put external drives on all of them and use them as a ceph storage cluster.
If this guide was at all helpful to you, consider commenting and giving me feedback.
![]()
Leave a Reply